Filed under: printmaking | Tags: art, artist, chine colle, print, printmaking, woodblock printing
Last night’s woodblock class was pretty good. I had a new block to incorporate into the mix, luckily. I also spent the whole time printing, which is what I like to do. I ALSO got to choose the colors, which is good. Sometimes, I just use the colors that have been put out. Last night, however, I selected the colors, which made a big difference for me. I prefer when the colors are more transparent. It seems that many of the colors that we use (which are previously mixed colors) have some white in them, which makes them a bit opaque. This isn’t the effect that I want. Perhaps next week, I’ll ask to mix in some transparent medium.
Here is the first one that I did:

I have no idea why the picture has such an orange cast to it. Anyway…this print started with the yellow layer, then I printed the dark brown block, and last I printed the teal block. I was moderately happy with it. I felt that the white was too constrained, though, so I tried again:

I’m happier with the white in this print. Here is a detail of it:

As I only have two carved blocks in this series and of this size, I sort of ran out of ideas of what to do (besides mixing more colors). I tried to experiement a little, but I wasn’t happy with the outcome:

Ech. Needs work. In mulling over ideas with my super helpful teacher, I felt that adding some “chine colle” or collage would help. So, I took another piece of paper, and just started randomly printing on it. I plan to rip up this paper and layer it onto the print above, in an attempt to help it along. Here is the sacrificial page:

Kind of interesting, in an off-kilter sort of way. I ran out of time, and couldn’t do more layering. I also ran out of the bright ochre color. Too bad! I’ll see if I can mix up more next week. I do like these colors together, though. I also hope that I can carve another block.
It’s going to be another sweltering day. I can already feel my brain dulling with the pending heat.
Can anyone out there recommend some interesting woodblock artists to look at?
Anyone out there also doing printmaking? (Do you have a website that I can look at?)
If any of you out there have either an ipad or an iphone…there is an app that I would LOVE to have. It’s “Wreck this App” by Keri Smith. She is that super cool, highly unconventional author. It’s basically an app for making crazy, messy art. So fun!!!! If anyone out there gets it, let me know how it is. I want it…but alas…no iphone! Here is the link to her blog which has a video on it. What do you think???? So fun, right????? I want it!
Filed under: printmaking | Tags: art, artist, chine colle, croissants, print, printmaking, woodblock printing
Last night, I had my woodblock printing class. I managed to get my act together and finish a block for printing. I was initially sort of lukewarm about the block, as it seemed sort of flat and 2D to me. But, after printing it, I think that it is interesting. The first printing was with some chine colle, or additional handmade papers collaged into it. My teacher provided the colored papers. Here is that print:
 It’s a bit of an overcast day, so it’s hard to get the colors right. This image seems a little dark to me, even after I lightened it a bit! The red paper is a scrap of beautiful handmade paper that my teacher had. The small green piece is a scrap of paper that had been used in previous prints. I’m really happy with this.
Then, I started layering this block with a small block. I printed this small block at the last class. It needed a lot of “cleaning up”, which means that there were parts of the block that were printing that I did not want to print. So, I had to carve more to get rid of those stray marks. Here it is:

I may try to print this one again, as I think that it would be better without the black, and with more white in it. Here is a detail:

This last print begain with a ghost print of the large, blue block. Then, I layered on some red with ripped paper stencils:

I think that my teacher liked this one. I tend to overwork things, so I decided to just leave this one alone and not do anything further. Here is a detail:

I like woodblock printing. I think that having a class once a week is good, but it does add stress to the process. I mean, you have to have something finished each week, or else you will waste your time at class carving. I try to use class time to print, as that is a rare opportunity to use the press. I can carve at home, but I can’t print with a press at home. I think that the carving would be more meditative for me, if I wasn’t rushing to finish a block for class! So, I can imagine that having one’s own press would help, even when carving.
Someone recently sent me this fabulous link to watch someone baking croissants. Please watch, as it’s fascinating! It’s kind of scary how much butter in involved. Anyway, I thought that if I ever get a press…and if I ever decide to stop printmaking, I could use my press for flattening out dough for pastries…who needs a rolling pin when you have a piece of precision equipment, right?
Hmmm…a pain du chocolat would be perfect right now.
Filed under: Fleeting thoughts..., printmaking | Tags: art, artist, chine colle, drypoint, printmaking, Visual Arts
There are lots of goals that one can have in life. One of mine is to pursue art. Lucky me…I’m getting to do that a bit! But, then what? Art is a field where there is no clear path. In some ways, being an architect is simpler…as once you get hired, someone is coming to you with their problems to solve: “We’re designing new student housing for this college”…or…”Find out what the zoning restrictions are for this site”…or…”Draw up some wall sections for this facade”…etc. Even when you own your own firm, and you’re “the decider” (silly word), the client comes to you with their problem to solve. In art, you’re coming up with the problems, and the answers.
Back to goals: there are so many different goals that one can have as an artist. Someone might dream of getting their work shown at the Whitney. Someone else might dream of just making a living off of one’s art. Another person might just want to feel happy with the work itself, regardless of any outside recognition. These are all reasonable, of course, but they require different strategies for working. In the first one…the cutting edge fine art world is your “client”. Are you innovative enough to be at the Whitney? In the second example, the art buying population is your client. Is your art buying population people who love landscapes…so, you’ll do landscapes? Or, is it people who love photographs of people? old buildings? puppies? In the third example, you are the client. Are you happy with your work? Do you feel satisfied/stimulated/excited by the work?
Ideally, I suppose, one would be able to satisfy all three of these goals at once: to be recognized by the fine art world as worthy…to be able to live off of that worthy art…and to feel a sense of satisfaction with the work. Not an easy thing to do! I have yet to decide where I’m putting my energies. For the moment, I seem to be focusing primarily on goal three: just being satisfied with the work.
If you are an artist, what have your experiences been in regards to these types of goals? What are your goals?
Food for thought that I have been gnawing on for some time now…
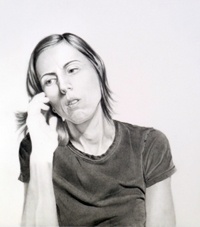
Here’s is what I printed last night in class:

On the day that I was making sketchy scribble doodles, I also made a drypoint plate. This is the print from the plate. I like it. I like the feel of it and the look of the lines. I may do more of these. I also added some chine colle to another printing of it:

Sort of interesting…the paper looks very dark in this photo. It’s actually a sort of dark, orangeish, sand color. I’m not sure about these pieces, as they are a bit of a distraction. I may try this again with a more neutral/lighter color of paper…but I didn’t have any at the time to try out. Here’s a close up:

I also made another print of a child, similar to the previous one. This one was printed with different ink and different paper, however. I think that I might prefer the other ink that I was using. Here it is:

This is based on an image of my friend’s daughter. I’ve also got a closeup, so you can see that the black area actually has some texture:

I think that on my next print in this series, I’m going to do more with that texture…play with it a bit more. Any comments?
It is very cool and mild today…we had lots of rain and thunderstorms yesterday. I love this kind of post-storm weather. I also like pre-storm weather as well.
OH…for those of you in the Boston area…you MUST go to Berryline for frozen yogurt. There is one near Harvard Square on Mass Ave. SO AMAZINGLY DELICIOUS. I despise TCBY, which tastes like frozen plastic. Berryline, however, is so delicious. The yogurt actually has that tangy, yogurt taste…and it’s FABULOUS. You know it’s good when instead of getting M&Ms on my yogurt, I decided that fresh mango was better. It was. Go now and get some. I’m suffering from some serious Berryline withdrawl, I think…
Filed under: printmaking | Tags: art, chine colle, drypoint, print, printmaking, visual art
It’s been SUCH a crazy week. I spent the whole week preparing for a portfolio review, which was held today. SO INTERESTING. I met with four reviewers: Philip Prodger of the Peabody Essex, Dina Deitsch of the DeCordova, Katherine French of the Danforth, and Jane Young of the Chase Young Gallery. It was fascinating to hear each of their reactions to what I presented, and their suggestions of how I might proceed. By the end of the morning, my head was spinning with all of their comments and thoughts. So much to think about…
P.P. suggested that I consider learning aquatint and soft ground etching. I think that he liked what I’ve been doing with the carborundum in my prints, and thought that aquatint/soft ground etching would benefit me. Both of those types of printmaking require acid, so I’ve not been able to try them. I think that he felt that my work was interesting and had potential. He seemed to like the complex layering and gestural mark making.
D.D. really liked my drypoints, and wanted me to push this further. I showed her that small drypoint of my son, which is the print recently accepted at the Center for Contemporary Printmaking. I found her positive response to the drypoints really interesting, as I think of the drypoints as much more “conventional”. She felt that I could take advantage of my ability to draw and drypoint’s “traditional” aesthetic, and do something different with it.
K.F. was very positive, and said that I need to find the “right teacher”. She suggested that I consider a master’s program (gulp!). She said that my work was visually sophisticated (!), and on the edge of being really exciting. She also encouraged me to continue with the more energetic mark making that appears in my work. That comment seemed to be a running theme from the reviewers.
J.Y. helped me to understand more what a gallery owner is looking for. They are looking for a “clear voice” in the work. She liked the tension between the “uncontrolled” abstract marks in the prints, and my clean drawing that gets overlaid. I also learned how works on paper can be more challenging for a gallery to deal with.
I have so much to think about now.
Here are some of the new prints from this week:

This is a continuation of the “long” series of prints on Japanese paper. This paper had some existing marks on it, from previously toying around with some printing. The large, textured piece of paper is chine colle, which took the ink in interesting ways. I like the abstract vertical form.

and

This series on chairs got some interesting comments. I think that people responded well to the layering and textures. The icon of “chair” brought much debate/discussion. Several of the reviewers talked about “narrative”, which comes when one uses a recognizable form like this.

and:

and:

and:

This series was an exercise in restraint. Perhaps I have pulled back on the reins too far…but I wanted to try to work more “simply”. These prints are very much about “chance” and do not have any drawing marks on them. These prints got mixed reviews.
All in all, I learned so much. I know how important good teachers are. My teachers at UPenn for architecture were amazing. I absorbed an incredible amount in three years. I’d love to be able to do a fine art master’s degree. Maybe it isn’t as out of reach as I think! I can eat ramen noodles for a year…it will just be a year of being bloated and thirsty with an MSG headache, no prob. 🙂
Filed under: printmaking | Tags: art, chine colle, drypoint, Ink, Monotyping, Paper, printmaking, Prints, visual art
So, the past few days were a bit productive. I did lots of drypoint prints on Thursday, and some more solarplate prints today. Last night, we had an amazing class with Catherine Kernan, who showed us viscosity monotypes. This is where you work with both very thin ink, and very stiff ink simultaneously. The two inks react to one another in very interesting ways. I don’t have any images to show this week, though! Our class worked collectively on five prints. It was fun, as we just experimented with making marks, and were amazed at our results. Hopefully, I will be able to show you one next week!
These are the drypoint prints that I made. I incorporated a little of that carborundum technique. This is where there are areas of dense color. I’m not sure that it was so successful, so I’ll have to try again.

Hmmm…I also tried rotating one of the plates:

Hmmmm. Then, I tried some chine colle…

Also just “hmmm”…then I tried one of the plates in isolation…I liked this one the best:

Any thoughts?
Here are the solarplate prints. I managed to print the relief plate this time. This means that as opposed to smooshing the ink into the grooves, and wiping away the rest…a relief plate has the ink just rolled on the surface. I liked this, as it created an emboss, and gave the prints more character. I’m not so fond of the “flatness” of the smooth solarplate prints. Here is what the emboss looks like:


Can you see how the paper is raised?
Here are the actual prints:

The greenish in the photo above is from the relief plate, so it is not just ink on the paper…it also has indented the paper as well (as shown above).

I’m showing these in the order in which they were made…

My teacher thought that this one above looked “complete”. So…I have to “complete” the others at some point…

And another:

I generally like these. I agree that there is something “missing” in most of them. I need another layer. It’s always hard to add another layer later. When these are printed, the paper has been soaked. When paper dries…it shrinks, so you can’t put the same sized plate on unless you resoak it. Unfortunately, sometimes the paper still won’t expand up to it’s previous size when you resoak it, then the plate marks at the perimeter won’t line up with the previous marks. You can be VERY VERRRRY fussy in printmaking. Actually, I should say…you are supposed to be VERY VERRRY fussy. The only people who can thumb their nose at these rules are established, celebrity artists. So…not me. Not by a long shot.
Any comments? Feedback? Helpful suggestions? Random thoughts? Favorite place to get coffee?
Filed under: printmaking | Tags: art, chine colle, collagraph, drypoint, Ink, printmaking, Prints, visual art
This week, we printed our carborundum collagraphs! Very exciting. Carborundum is a very fine grit, smaller than sand. You mix it with an acrylic medium, to create a grainy gel. Then, you put the grainy gel on your plate how you’d like. The grains will hold ink, so that wherever you put this gel is what will be inked on your plate. An added bonus to this process is that the carborundum is bumpy, and leaves a cool emboss on the paper. It also allows one to get very dense, saturated color. Here is how the two plates that I made looked on their own:


You can see the dense color on the print…this is where I applied carborundum to the plate. I have also included a close up, so that you might be able to see the textured emboss:

Okay, maybe that’s too hard to see. Here are other prints that I made with these plates:


So, I used black ink for these prints, but those black areas could be any color. Of course, now that the plates have been printed with black ink…it’s kind of hard to change that.
I also printed again with the drypoint plates that I made earler. You will likely recognize that from my previous posts where I used these drypoint plates:

another:

Then, I printed the two plates together, with no other layers of ink:

I liked how they turned out…generally. The two previous ones may be a bit “flat”, because of the textured/colorful background. Hmmm…comments? Perhaps they need some carborundum!
Here are two random prints with chine colle:


The first plate of the two began with a ghost print of the second print. (a ghost print is when you reprint a plate, without adding new ink).
I also made more solarplate prints. I was tired of using photographic images…they were a little flat, so I went back to directly marking on acetate to make the “negative” for these plates. Please forgive my color choices…as I mentioned in a previous post, there was a serious shortage of red. I know…that’s no excuse really. I’m not fond of the all green one, but I like the one with purple:


I like those, and so I’ll keep trying to print them, to see how I can improve the layering. Next time, I’m going to try to get the colors to be more transparent.
And…last but not least…I did another color scheme of the Regent theater print. I am going to submit this print with the other one to the local show. Yes, I’m not sure if the ink will totally be dry by tomorrow am! I wonder if I could speed up the drying with…a hairdryer? A tanning bed? Probably not.

What do you think? Thumbs up? Thumbs down? I like how this Regent one turned out…even thought it may look as if it should have been a screenprint!
Filed under: printmaking | Tags: art, chine colle, Ink, printmaking, Prints, Visual Arts
So, I’m getting ready to try to submit this print of the Regent Theater to the “Images of Arlington” show coming up. I’ve been experiementing with different papers and inks. The first prints look “blotchy” to me. I’m not sure if that’s my own hang up…or if that would be something that a real printmaker would also dislike. Hmmm. So, I switched inks and tried printing a new paper. Here it is:

I know…why bother? Well, I’m trying to improve my printing techniques, so that I don’t have to get as frustrated as I do. As you may notice, the colors are slightly different from the last printing, as I didn’t mix the colors EXACTLY the same. That might be a challenge for anyone, as the inks were different.
I also printed one with just the final block. Here it is:

Yes, this is on yet another type of paper. I may add watercolors to this one…or I may just leave it alone. I think that this could also look nice on colored paper. Or some chine colle! My new favorite technique…(refer to previous posts).
I’m also going to TRY to make another print of this, but in a different color palette. (did I spell that correctly?) I am slightly concerned that the ink won’t be dry by the time that I need to frame it and submit it. Maybe I can frame a print with wet/tacky ink? No? Bad printmaking etiquette? See! There is so much benefit to being a novice…we don’t know any better!

I went to the Boston Prinmaker’s Bienniale at the Danforth Museum this weekend. SO AMAZING. Seriously…anyone in the metro-Boston area should go. The work was so stunning. So much talent. I wanted to own all of the prints. There was also a student exhibition of prints, which was also phenomenal. Please go see it!
It did “fire me up” to go home and do stuff. However, I am somewhat blue that my stuff is so remedial in comparison to all of the work that I saw. I know…you’ve got to start somewhere…but it would have been so convenient to have been a “prodigy” at something, right? Instead of starting at the bottom, you start at the top! Oh well.
It has been lovely and sunny all day…which puts me in a good mood, even though I’m scowling at my prints. Has anyone else seen the printmaking show at the Danforth? Thoughts?
Filed under: printmaking | Tags: art, chine colle, drypoint, Ink, Linoleum, printmaking, Prints, Visual Arts
So, I FINALLY finished carving the linoleum. I printed it! It turned out okay…I think that I’m going to try printing it again, to get the ink to not look as blotchy. This blotchy ink might be because: 1. I printed wet ink onto wet ink 2. of the type of ink that i used 3. I had large expanses of uncarved areas. If anyone out there is an experienced linoleum block printer…PLEASE give me some feedback! Any helpful suggestions for printing would be SO helpful. So here is the print:

Not bad…needs some work. I am also going to try printing it on different paper. I need to get more of that paper, though, so I’ll be heading to Utrecht at some point.
I also did a drypoint as well. I really like drypoint now. I didn’t at first. I’m not sure why I like it again. Perhaps because it is somewhat similar to just drawing. I am looking forward to layering my drypoints. The first print is the drypoint as is:

I know…boring/blech…I added chine colle, and it’s much better:

The blotches on the print are actually shadows from stuff on our windows. Yes, we need our windows washed, but it needs to get above freezing first. This morning, it was 17 degrees. Brrr. I’ll have to come up with a new excuse in the summer why I still can’t wash the windows. Right now, the temperature outside is to blame.
I made four solarplates, to be printed next week. I also made two carborundum collagraphs. This is a kind of sandy grit that you put onto a plate with acrylic medium. When it’s dry, you can ink the plate and the grit will hold ink. So, instead of etching texture into a plate, I’m adding it on the surface. Here are the plates:

I know. Hard to see because of the clear plate. Here is another one made on foamcore:

This should be neat. I’ll print it next week, and hopefully post the images. Unless, of course, they’re horrendous. Actually, I generally would post that anyway!
We did a group crit at one of my printmaking classes. It was the first time that I’ve had actual printmakers look at my work. It was great to hear their comments and feedback. As I’m a complete amateur, I don’t have an overall aesthetic to my work…so it’s kind of chaotic. My printmaking teacher used the word, “exuberant”, instead of chaotic. Perhaps I’ll stick with that for now.
Filed under: printmaking | Tags: art, chine colle, drypoint, Linocut, printmaking, Visual Arts
A rainy, grey day here in the Boston area. My son has caught a cold, so I’m trying to avoid having him cough on me excessively.
Last night’s printmaking class was a lot of fun…just five of us trying anything out that comes to mind. Everyone does such different stuff. I wish that I could show the other students’ work as well! You’d see how interesting and diverse our things are.
I had made a drypoint plate, which shows up in several of the works. I also did a lot of chine colle this week. I had some interesting origami paper that I incorporated into lots of these pieces.
I’m also working on a bigger linocut. It’s going much more pleasantly than my previous one, as I’m using a better kind of linoleum. I’ve decided that the classic, “battleship grey” linoleum is a pain. This one is a golden color…cuts more easily…doesn’t crumble as easily, and is generally more pleasant to work with. I’ve also pulled out my woodcarving tools, as my little Speedball set of tools is limited and clunky.
So, here are the prints from last night. I like the greys with the bright pops of color. My favorite is the last one…

All of the pictures are going to be dark, as there is no sunlight today! This one above is the drypoint plate with chine colle. I did this a few times:

And again:

I was experimenting with how I removed, or wiped, the ink from the plate. Some are better than others! See how “inky” that one is?
Then, I took a break from that drypoint plate. I had springtime colors on the brain…in amongst the grey…

Even brighter:

I’m not sure if I’m finished with that one.
A bit of an experiment with scratch foam…kind of like the styrofoam trays that you get from the grocery store. I like the fact that the pieces look like they are part of the sky, but somehow the overall isn’t great. I need to help it somehow…suggestions?

Some layered chine colle…I’m not sure if I’m finished with this one yet either:

I like this one the best, even though the registration was off. I started with a monotype, then I decided to put my drypoint plate on it. Unfortunately, the plates weren’t the same size…but I didn’t care…spoken like a true novice:

What do you think? Helpful comments? Advice from experienced printmakers? I have to say…I look over these prints, and most seem incomplete. So, I’ll see if I can revist them at my next class…
Are you as tired of winter as I am??? I planted some bulbs this year, so I am hoping to see some pops of color in a couple of months! Until then, I have to stick with ink…
Filed under: printmaking | Tags: art, chine colle, collagraph, Ink, intaglio, printmaking, solarplate, Stencil, Visual Arts
I made quite a few prints this week! It’s also been a lovely 55 degree day today. I think that we’re all giddy with the warmth and sunshine. It does feel wonderful to look up and feel the warm sun on your face and a fresh breeze…as opposed to biting wind and frigid air that makes your eyeballs ice over.
So…dabbling. Lots of dabbling this week. The prints are all over the map.
This week, I had a class with Debra Olin. She was wonderful! So talented and fun. You can see her work here. She showed us stencil work, and chine colle. Chine colle is sort of like collage, but one typically puts the pieces of paper to be glued onto the print not directly ON the print, but on the plate instead. When the plate is rolled through the press, the glue backed chine colle pieces adhere to the print. Very cool! I didn’t do much of it. Here is one with a collaged piece:

The large square is another piece of inked paper stuck on the larger print. Neat!
Here are some things that I did with stencils:


These were fun to do. I’m definitely going to play around with this stuff some more.
I also tried a collagraph. I wasn’t thrilled with it. I kept trying to rework it to improve it. A collagraph is a plate where things are stuck onto it, and those things are inked and a print/emboss is made from them. Here it is:

It looks like a circus. Hmmm…
In my other printmaking class, I made a couple of solarplates. I was pretty lukewarm about these. Also, you will notice in the brown print that there is a whitish margin. This is caused from the solarplate having a slightly curved edge, which allows light to seep in and make that mark. GRRRRR…shoddy plates. So, next time, I may try making a smaller image, and then cutting the plate edges, to hopefully get rid of this problem. VERY frustrating.


See the whitish margin? Frustrating. I was excited to do solarplates, because of the photographic possibilities. But, I haven’t yet done anything that I’m thrilled with. Perhaps the fact that I’ve only been printing them with one color…
This last print is one that I did at home. You’ll notice the sort of washed out look of it. This is because I hand burnish it, as I don’t have a press. I looks okay. I always seem to encounter some registration problem. I’m still happy with it, though.

So, what do you think? Do you like any of these? Throw them all out? Keep them?
