Filed under: printmaking | Tags: art, artist, Ink, Paper, print, printmaking, Screen-printing, visual art, woodblock printing, Woodcut
I’ve finished up the woodcut print that I started last week. I’ve printed this woodcut several times…with several different types of ink and paper. This is on a grey Stonehenge paper with oil based relief inks:

Here is the group on our coffee table:

I’m still not happy with the printing. I’m going to have to get some feedback on it. I think that a press would help, but besides that…there must be other things that I can do to get a better print.
I also did a few abstract screenprints. I need to redo the actual screen, as it started to leak ink out of the side a little. I like these, just as a start of something…

I still haven’t found paper that I think is great with this. I’ll have to ask around. Any suggestions?

I’ll have to remount that one…

I liked that one a bit. Last one:

I’d love to have a real setup for screenprinting. One more thing on the to do list…
If anyone out there does either woodcut prints or screenprints…please give me your recommendations on paper & inks!
It’s an amazing, sunny day out there. It might even be in the 40s! We’re starting to see some activity in our “garden”. I put this in quotes, as it’s a small miracle that anything decides to come up at all. I don’t have a green thumb, even though I have good intentions and try hard. Here are what’s popping up today:

Filed under: printmaking | Tags: art, artist, Brayer, cmyk, lithography, Paper, photo, print, printmaking, visual art
Okay, my internet connection hiccuped, and I’m writing this for the second time. Grr.
So, I finished the pronto prints that I started last week. I had to print each CMYK on a different day, to let the ink dry. I also tried out three types of paper, to see which I liked best. After doing all of this, I thought of a fourth type of paper that I think will work great, but too late! Next time…
This is printed on paper #1 (Rives lightweight):

This paper worked fairly well, but it’s wrinkled. I’ll have to experiment to see if I can flatten it.
Here is paper #2 (Arches 88):

This paper is smooth, and picks up the ink well. Unfortunately, the paper isn’t sized, so it doesn’t react well with the wet pronto plate. Oh well.
Here is paper #3 (Rives BFK):

Not great, as this paper has too much tooth.
Also, I just ordered a larger brayer, which should help enormously. Right now, I’m working with the tiny speedball brayers. As a result, there are always lots of brayer marks on the prints, as I can’t roll over the image in one motion completely. I have to go over it twice, and the circumference of the brayer is also too small. SO! We’ll see what happens when I get the bigger brayer, and try on a different paper. One other thing that I think: this image has only part of it in focus, the rest is out of focus. This looks cool as a photo, but I’m not sure if it works with this type of printing, as it just ends up looking too blurry. Next time, I’m going to use an image that is all in focus, to see if that looks better. These aren’t supposed to be exactly photographic. (If I wanted that, I would just print it on my inkjet!)
This weekend, I went to the Craft Fair held by the Boston Society of Arts & Crafts. So amazing! So much gorgeous stuff. Lots of beautiful pottery, clothes, jewelry. Needless to say…I got a sandwich there, that’s about it. Maybe I’ll start to save up, and get something spectacular in 2015.
Filed under: printmaking | Tags: art, artist, CMYK color model, Ink, Paper, print, printmaking, visual art, Woodcut
I’m working again with pronto prints and my previous woodcut. I’ve been scheming ways to make registration for the CMYK pronto prints work better. My latest attempt may be good. I managed to register the yellow and magenta layers. Here they are:

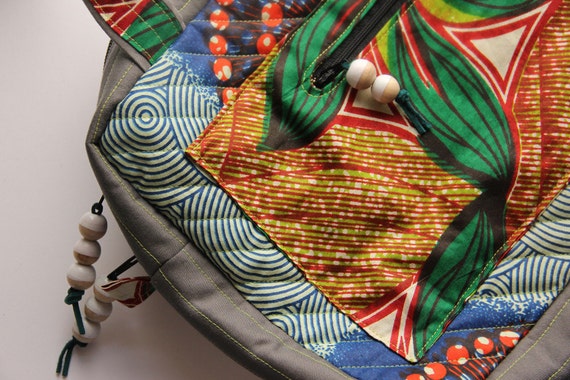
I’m also experimenting with three types of paper. The paper on the right is Arches 88, an unsized paper…very absorptive. This isn’t such a great quality with the way that I’m doing these prints, as the area around the print gets wet from the plate, and this causes the surface of the paper to deform from the moisture. Hmmm. The other two papers are better in this regard, but I think that because they are sized and have more of a texture, they don’t take the ink as well. Here’s a close up:

I also changed the halftone lines per inch, to make it less fine grain. I have to balance clarity of printing (as pronto plates like distinct black/white), and clarity of image (fewer/larger dots=more abstract/blurry print). Hmmm! I think that the cyan layer, which I hope to do this weekend, will be revealing…
I am printing the woodcut on grey paper. This is a heavy paper, unlike the fine Japanese papers in my previous post. I have to let the first layer dry before putting on the second layer…I also switched inks again. I know…I keep changing all of the variables! I am quickly running out of space for all of these prints. I need to devise some safe storage system.

There are some sparse snowflakes blowing around outside right now. I really hope that they don’t amount to anything. Maybe I should make some prints about snow angst? The flakes are almost like white gnats bumping around…shoo! Go away! I’m tired of my boots/hat/gloves/scarf ensemble! 🙂
Filed under: printmaking | Tags: art, chine colle, drypoint, Ink, Monotyping, Paper, printmaking, Prints, visual art
So, the past few days were a bit productive. I did lots of drypoint prints on Thursday, and some more solarplate prints today. Last night, we had an amazing class with Catherine Kernan, who showed us viscosity monotypes. This is where you work with both very thin ink, and very stiff ink simultaneously. The two inks react to one another in very interesting ways. I don’t have any images to show this week, though! Our class worked collectively on five prints. It was fun, as we just experimented with making marks, and were amazed at our results. Hopefully, I will be able to show you one next week!
These are the drypoint prints that I made. I incorporated a little of that carborundum technique. This is where there are areas of dense color. I’m not sure that it was so successful, so I’ll have to try again.

Hmmm…I also tried rotating one of the plates:

Hmmmm. Then, I tried some chine colle…

Also just “hmmm”…then I tried one of the plates in isolation…I liked this one the best:

Any thoughts?
Here are the solarplate prints. I managed to print the relief plate this time. This means that as opposed to smooshing the ink into the grooves, and wiping away the rest…a relief plate has the ink just rolled on the surface. I liked this, as it created an emboss, and gave the prints more character. I’m not so fond of the “flatness” of the smooth solarplate prints. Here is what the emboss looks like:


Can you see how the paper is raised?
Here are the actual prints:

The greenish in the photo above is from the relief plate, so it is not just ink on the paper…it also has indented the paper as well (as shown above).

I’m showing these in the order in which they were made…

My teacher thought that this one above looked “complete”. So…I have to “complete” the others at some point…

And another:

I generally like these. I agree that there is something “missing” in most of them. I need another layer. It’s always hard to add another layer later. When these are printed, the paper has been soaked. When paper dries…it shrinks, so you can’t put the same sized plate on unless you resoak it. Unfortunately, sometimes the paper still won’t expand up to it’s previous size when you resoak it, then the plate marks at the perimeter won’t line up with the previous marks. You can be VERY VERRRRY fussy in printmaking. Actually, I should say…you are supposed to be VERY VERRRY fussy. The only people who can thumb their nose at these rules are established, celebrity artists. So…not me. Not by a long shot.
Any comments? Feedback? Helpful suggestions? Random thoughts? Favorite place to get coffee?
Okay, so here is another one in this series. I like this, as I both changed the paper, and I tried to have more ink. These are reductive prints, meaning: I start out with the plate fully covered with ink, and then I wipe away the areas that I don’t want to have color. Messy! So, this last time, I tried to leave more ink on the plate. Better.


